
How to Grip a Golf Club | Neutral, Strong & Weak Explained
This post contains affiliate links. As an Amazon Associate, we earn from qualifying purchases.
This post contains affiliate links. As an Amazon Associate, we earn from qualifying purchases.
To grip a golf club, you must align your hands correctly on the handle, place the club in your fingers, not your palm, and apply balanced, upward pressure. The three main hand placements are neutral, strong, and weak. For a right-handed golfer, a neutral grip shows 2 to 2.5 knuckles on the left hand, a strong grip shows 3 or more, and a weak grip shows 1 to 1.5.
That knuckle count is the mechanical shortcut, but the real action happens underneath. Grip pressure, not just hand placement, drives the data difference between weekend players and pros. A study from The Golf Lab in Toronto shows amateurs grip too softly at address, then add inconsistent pressure during the swing, a recipe for slices and hooks.
What follows: the exact steps to build a repeatable neutral grip, when to deviate from it, and how to manage pressure so your body isn’t fighting your hands for control by the ninth hole.
Key Takeaways
- A neutral grip (2-2.5 knuckles visible) is the most repeatable starting point, but physical factors like arthritis or small hands may require a strong or weak variation.
- Place the club handle in the fingers of your lead hand, running from the base of the index finger to just below the pinkie pad. A worn spot on the heel of your glove is the telltale sign you’re gripping in the palm.
- Forget “hold it like a baby bird.” Data shows pros squeeze harder at setup and maintain consistent pressure. Focus on pulling up with the last three fingers of your top hand to create control without forearm tension.
- Keep the same grip style and hand position for all full-swing clubs. Consistency here matters more than minor optimization for driver versus iron.
- Regrip your clubs every 40-60 rounds. Worn, slick grips force you to squeeze harder, which introduces tension and ruins swing speed.
Why Your Grip Is Your Swing’s Foundation
Ben Hogan called it the beginning of good golf. He was right, but not for the reason most people think. The grip isn’t just a handshake with the club; it’s the translation layer for every instruction your brain sends to the clubhead. A faulty grip means the message gets corrupted on the way down.
If the hold is wrong, the body will spend the whole swing fighting to compensate and square the face. The hands are where you earn trust with a student. Adjust the grip and the ball starts going straighter in ten minutes.
That’s the GOLFZON Leadbetter principle. The most common error is letting the club settle into the palm of the lead hand. You can spot it from across the range by the shiny, worn patch on the heel of a player’s glove. This fault locks the wrists, forces the arms to tense, and makes squaring the clubface a chore instead of a natural result. Your slice might be a grip problem wearing a swing issue’s clothes.
The fix is in the fingers. Open your lead hand and lay the handle across the base of your fingers, angling up toward the pad just below your pinkie. When you close your hand, the club should be secured by the last three fingers. This position lets your wrists hinge freely and gives you a true sense of where the clubface is pointing throughout the swing.
The Three Main Grip Types (Neutral, Strong, Weak)
These terms describe hand rotation, not how hard you squeeze. Your choice here pre-sets the clubface and directly influences your ball flight. It’s the first and most powerful dial you can turn.
The Neutral Grip: The Reliable Baseline
For a right-handed player, a neutral grip starts with the lead hand placed so you see two to two-and-a-half knuckles when you look down at address. The “V” formed by your thumb and forefinger should point toward your right eye. Your trail hand then mirrors this position on the other side of the club, with its “V” pointing toward your left eye. This symmetrical, “prayer hands” setup is the default because it doesn’t actively promote a draw or fade. It’s the most repeatable starting point for building a consistent swing.
The Strong Grip: For Draws and Fighting Slices
Rotate both hands clockwise on the grip. On your lead hand, you’ll now see three or more knuckles. The lead-hand “V” points toward your right shoulder. Your trail hand will sit more underneath the handle. This position pre-closes the clubface, making it easier to square at impact. It’s a common fix for a persistent slice and helps players who struggle with an open face. The trade-off: if taken too far, it can over-close the face and produce a low, snapping hook.
The Weak Grip: For Fades and Taming Hooks
Rotate both hands counter-clockwise. Your lead hand will show only one to one-and-a-half knuckles, with the “V” pointing toward your chin or left eye. The trail hand sits more on top of the grip. This opens the clubface slightly at address, which can help a player who hooks the ball by preventing an over-rotation through impact. It can also promote a higher ball flight. The risk is that it makes closing the face harder, which can exacerbate a slice.
| Grip Type | Lead Hand Knuckles | Ball Flight Tendency | Best For |
|---|---|---|---|
| Neutral | 2 to 2.5 | Straight | Most players, repeatability |
| Strong | 3+ | Draw / Hook | Fixing a slice, players with limited wrist mobility |
| Weak | 1 to 1.5 | Fade / Slice | Taming a hook, hitting a controlled fade |
How Your Hands Connect: Overlap, Interlock, or 10-Finger
Once your hands are placed correctly, you need to link them. The connection point is where the pinkie of your trail hand interacts with the lead hand. There is no single “correct” method, but each has its own feel.
- Overlap Grip: The pinkie of the trail hand rests in the groove between the index and middle finger of the lead hand. This is the most common grip among skilled players. It promotes hand unity and is less stressful on the fingers than the interlock.
- Interlocking Grip: The pinkie of the trail hand interlocks with the index finger of the lead hand. This is a strong connection popular with players who have smaller hands or shorter fingers. Jack Nicklaus and Tiger Woods used it. It can feel more secure but may cause pressure points for some.
- 10-Finger (Baseball) Grip: All ten fingers are on the club, with no overlap or interlock. The hands simply sit side-by-side. This is the most intuitive grip for beginners and juniors, as it feels like holding a baseball bat. It can feel powerful but offers less connectedness between the hands, which some players find leads to inconsistency.
Your hand size and finger length often decide the winner. If interlocking feels pinched or causes pain, switch to the overlap. The 10-finger is a fine place to start, but most players gravitate toward an overlap or interlock as they seek more control.
The Grip Pressure Data Most Coaches Get Wrong

Everyone has heard Sam Snead’s advice to hold the club “like a baby bird.” It’s poetic, but the data from modern swing sensors tells a different story. Research from The Golf Lab shows that professional golfers actually apply more grip pressure at address than amateur players, and they maintain that pressure more consistently throughout the swing.
Amateurs, especially slicers, tend to grip too softly at setup. Then, as they start the downswing, they panic-grip with the trail hand, which pushes the club outside the proper path. Hookers, while closer to the pro profile, often increase pressure too early on the way down.
Where this goes sideways: Gripping too softly at address. You’ll instinctively clamp down mid-swing to regain control, which tenses your forearms, locks your wrists, and kills any chance of a fluid release.
The fix isn’t about crushing the handle. It’s about direction. GOLF Top 100 Teacher Jason Baile teaches that pressure should be applied by pulling up with the last three fingers of your top hand. Imagine the weight of the club hanging from those fingers, pulling the grip toward the middle of your chest. This upward tension keeps the clubface stable and allows your wrists to remain supple. Your thumbs should apply almost no downward pressure. If your forearms feel tight at address, you’re pushing down instead of pulling up.
Step-by-Step: Building a Repeatable Neutral Grip
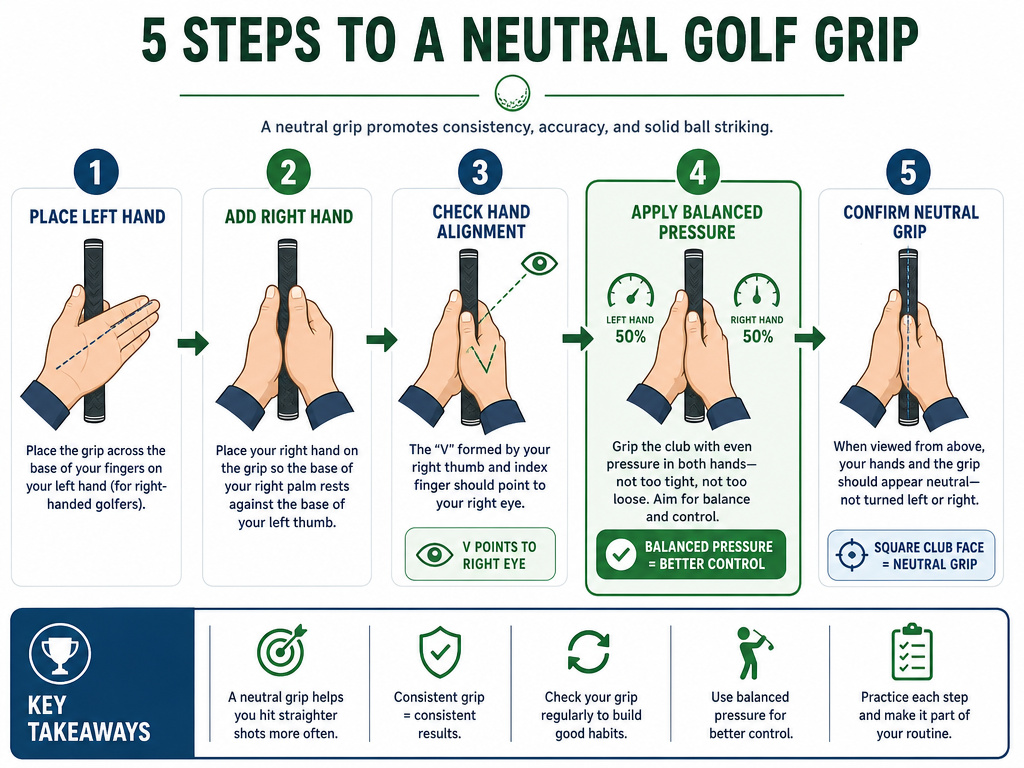
Follow this sequence to lock in a neutral grip every time. Do it without a club first to feel the hand positions.
- Position Your Lead Hand: Hold your left hand out, palm facing up. Lay an imaginary club across the base of your fingers, not in your palm. Close your hand so the handle is secured by the last three fingers. Look down; you should see 2-2.5 knuckles, and the “V” should point to your right eye.
- Add Your Trail Hand: Place your right hand on the club, letting it rest naturally so the lifeline of your right palm covers the left thumb. The “V” of your right hand should point to your left eye. Your hands should feel mirrored.
- Choose Your Connection: Link your hands with either an overlap, interlock, or 10-finger grip based on comfort and hand size.
- Apply Balanced Pressure: Squeeze gently with the last three fingers of your left hand, feeling an upward pull. Your right hand should feel supportive, not dominant. Your forearms and shoulders should stay relaxed.
- Check Your View: Look down at your lead hand. Confirm the knuckle count. The club should feel like a natural extension of your arms, not a foreign object you’re white-knuckling.
Skip step 4 at your own peril. Without the correct upward pressure, your grip is just a hand placement. The club will wobble in your swing, forcing compensations that show up as fat shots, thin shots, and a two-way miss by the back nine.
Common Grip Errors and How to Self-Diagnose
You don’t need a launch monitor to know your grip is off. Your ball flight and your glove tell the story.
- The Glove Heel Wear: A shiny, smooth patch on the heel of your glove means the club is sitting in your palm. Reglove and consciously place the handle in your fingers.
- The Persistent Slice: If your ball starts straight and curves right, you likely have a weak grip or are gripping in the palms. Try strengthening your grip a quarter-turn and moving the handle into your fingers.
- The Snap Hook: A ball that dives violently left usually comes from an overly strong grip. Weaken your hand position slightly so you see fewer knuckles.
- Tension in the Forearms: If your arms feel tight at address or during the swing, you’re probably pushing down with your thumbs. Focus on pulling up with the last three fingers of your lead hand.
- Inconsistent Strikes: Fat and thin shots often stem from a grip that’s too weak or in the palms, which prevents proper wrist hinge. You’re forced to use only your arms, losing the leverage needed for solid contact.
Easy to miss: Worn grips force errors. A slick, hardened grip doesn’t provide enough friction, so you subconsciously squeeze harder to maintain control. That extra tension is the root of many swing faults. Check your grips every season. A fresh set of golf grips is a cheap performance upgrade.
If you’re making a grip change, give it time. It will feel alien for at least a few range sessions. Hit half-speed shots to build the new muscle memory before going full throttle.
When to Break the “Neutral Grip Only” Rule
The neutral grip is a principle, not a prison. The best coaches know when the individual in front of them needs a different key.
Physical limitations are the main reason. Arthritis, very small hands, or unusual wrist flexibility can make a textbook neutral grip uncomfortable or even painful. In these cases, a stronger grip might feel more natural and allow for a better release. The goal is a grip that allows you to swing freely and return the clubface to square, not one that matches a diagram.
Some of the game’s greatest players have used non-standard grips successfully. The USGA’s equipment rules on grips allow for variation, specifying dimensions (like the maximum 1.75-inch cross-section) but not mandating one hand position. Even within the rules, there’s room for your personal blueprint. The priority is building a hold you can repeat under pressure, round after round. A comfortable, repeatable strong grip beats a forced, inconsistent neutral grip every time.
Tools and Maintenance for a Consistent Grip
Your hands are only part of the equation. The condition of your equipment plays a huge role. A worn grip is a liability.
- Grip Life: Plan to regrip your clubs every 40-60 rounds or once a year. Sun, sweat, and dirt break down the rubber, making it hard and slick.
- Cleaning: Wipe your grips down with a damp towel after every round. For a deeper clean, use a dedicated grip cleaner and a soft brush monthly to restore tack.
- Training Aids: If you’re struggling to feel the correct position, a grip trainer can be useful for initial feedback. Don’t become reliant on it; use it to learn the feel, then practice without it.
- The Right Glove: A proper golf glove provides consistent friction and protection. A worn-out, stiff glove defeats its purpose.
- DIY Regripping: If you play often, learning to regrip is a valuable skill. A basic regripping kit with grip solvent and double-sided tape pays for itself after a few sets.
Fresh gear removes variables. When your grips are tacky and your glove fits, you can focus on the feel in your hands, not on holding on for dear life.
Frequently Asked Questions
Should I use the same grip for my driver and irons?
Yes. Consistency is king. Use the exact same hand placement and grip style for every full-swing club in your bag. The only exception is your putter, which uses a completely different stroke and grip style (like reverse overlap or claw). Some advanced players may weaken their grip slightly for wedge shots to hit higher, softer shots, but that’s a nuanced adjustment.
How do I know if my grips are too worn?
Perform the thumbnail test. Press your thumbnail into the grip material. If it leaves a mark that slowly disappears, the grip is still good. If the material is so hard your nail doesn’t leave an impression, it’s time for a change. Visually, look for shiny, glazed patches or visible cracks.
Can changing my grip really fix my slice?
It’s often the fastest fix. A slice is caused by an open clubface relative to the swing path at impact. A weak grip or a palm-heavy grip makes it very difficult to square the face. Strengthening your grip and moving the club into your fingers pre-sets the face in a more closed position. Many players see an immediate improvement in ball flight on the range.
What’s the best grip for beginners?
Start with the 10-finger (baseball) grip. It’s intuitive and feels powerful. Once you’re making consistent contact, experiment with the overlap or interlock grip to see if one provides better hand unity. A good starter golf club set will come with grips suited for this learning phase.
Is there one perfect grip?
No. While a neutral grip is the most repeatable baseline, the perfect grip is the one that allows you to swing freely and return the clubface squarely to the ball most often. This is influenced by your physique, flexibility, and natural swing motion. Use the principles as a starting point, then adjust based on your ball flight and comfort.
The Bottom Line
Stop thinking of your grip as a static handshake. It’s a dynamic control system. Place the club in your fingers, aim for a neutral 2-knuckle start, and apply pressure by pulling up, not pushing down. Ignore the old “baby bird” advice, control requires intent.
Your grip won’t feel right overnight. Hit balls with the new feel at half-speed, and pay attention to the wear pattern on your glove. It’s the single cheapest swing fix you can make, and it’s the foundation every other improvement gets built on. Get this right, and everything else, posture, takeaway, impact, gets a whole lot easier.
