
Master When to Use a Draw vs a Fade for Lower Golf Scores
This post contains affiliate links. As an Amazon Associate, we earn from qualifying purchases.
Use a draw when your ball is below your feet, you’re hitting into a left-to-right wind, or you need maximum roll on a dogleg left. Hit a fade when the ball is above your feet, you’re facing a right-to-left wind, or you must stop the ball quickly on a dogleg right. The clubface controls the starting direction; the swing path curves the ball.
That’s the textbook answer, and it’s correct. But a scorecard doesn’t care about textbooks. It cares about the single decision you make over a ball that’s sitting in six different kinds of trouble. The real choice between a draw and a fade isn’t about which shape looks prettier. It’s about which one turns a bad situation into a playable one.
What follows is a breakdown of the three variables that actually matter: your lie, the wind, and the hole’s design. We’ll walk through a decision matrix, name the one club where the standard advice gets it backwards, and show you how to practice both shapes so they’re ready when the course asks for them.
Key Takeaways
- A draw’s right-to-left curve comes from an in-to-out swing path with a slightly closed clubface. It runs farther after landing.
- A fade’s left-to-right curve comes from an out-to-in path with a slightly open face. It lands softer with less roll.
- Your lie dictates the shot. A ball below your feet promotes a draw; a ball above your feet forces a fade.
- Use the wind, don’t fight it. Hit a draw into a left-to-right wind to hold the ball up; hit a fade into a right-to-left wind for the same reason.
- The driver is the exception. For most players, a fade is the more reliable tee shot, offering better control and a gentler miss.
The 3-Step Decision Matrix for Draw vs Fade
Forget trying to remember ten different rules. Your choice on the course comes down to three things you can see and feel right now. Work through them in this order every time.
The part nobody mentions: This decision needs to happen before you take your practice swing. Your rehearsal should be for the shot you’ve already chosen, not a search for one.
1. Diagnose Your Lie First
The ground tells you what’s possible before you even move. Your body’s adjustment to the slope creates a default shot shape.
| Lie Type | Natural Shot Tendency | Why It Happens | Play This Shot |
|---|---|---|---|
| Ball Below Feet | Draw/Hook | Spine tilts away from target, encouraging an in-to-out path. | Draw. Go with the slope. Trying to fade it requires a major compensation and often leads to a thin strike. |
| Ball Above Feet | Fade/Slice | Spine tilts toward target, promoting an out-to-in path. | Fade. Accept the left-to-right spin. Forcing a draw here usually means catching it heavy. |
| Sidehill (Ball Above, Feet Below) | Varies | Complex; depends on which slope dominates. | Fade (if ball significantly above feet). Draw (if feet significantly below ball). When in doubt, take the straightest club and aim for the fat part of the green. |
| Flat Lie | Neutral | No slope influence. | Your choice. This is where strategy (wind, hole shape) takes over. |
If you’re in a fairway bunker, the rule simplifies: always favor the fade. A draw’s lower, running trajectory is harder to get airborne cleanly from sand. A higher-flying fade gives you a better margin for error.
2. Read the Wind’s Real Direction
Most golfers look at the treetops. You need to feel it on your cheeks. Is it helping, hurting, or blowing across?
- Into a Left-to-Right Crosswind: Hit a draw. Your right-to-left spin fights the wind, holding the ball up and preventing it from being blown miles off line. A fade here gets magnified into a slice.
- Into a Right-to-Left Crosswind: Hit a fade. Your left-to-right spin counters the wind’s push. A draw here turns into a hook that runs through the fairway.
- Straight Downwind: Consider a draw. The extra roll is beneficial. A fade might stop too quickly.
- Straight Into the Wind: Consider a fade. The higher, softer-landing shot is easier to control and won’t balloon as much as a draw might.
Common mistake: Ignoring the wind because it “doesn’t feel that strong.” A 10 mph crosswind moves a 7-iron about 7-10 yards. That’s the difference between the fringe and the cup.
3. Map the Hole’s Danger Zones
Now look at the target. Where is the trouble, and where is the safe side?
- Dogleg Left: A draw is the strategic play. It follows the curve, giving you more roll and a shorter approach. Missing with a fade leaves you in the rough on the wrong side of the fairway.
- Dogleg Right: A fade is the call. It shapes with the hole. A draw risks running through the fairway into the trees.
- Pin Tight on Left: Hit a fade. Aim at the center of the green and let the ball drift toward the pin. A draw brings the bunker or water on the right into play.
- Pin Tight on Right: Hit a draw. Start it at the middle and bring it in. A fade risks missing left.
- Front Pin with Trouble Behind: Hit a draw. The lower trajectory and more roll help you avoid going long.
- Back Pin with Trouble Short: Hit a fade. The higher, steeper descent helps you stop it near the hole.
This three-step check, lie, wind, hole, takes ten seconds. It turns a guess into a plan.
Draw vs Fade: A Side-by-Side Breakdown
Understanding why each shot behaves as it does makes the decision intuitive. It’s not magic; it’s physics.
| Aspect | Draw | Fade |
|---|---|---|
| Ball Flight | Right-to-left (for a right-handed golfer) | Left-to-right |
| Swing Path | In-to-out relative to the target line. | Out-to-in relative to the target line. |
| Clubface | Slightly closed relative to the path, but open to the target at impact. | Slightly open relative to the path. |
| Trajectory | Generally lower, with more penetrating flight. | Generally higher, with a steeper descent angle. |
| Landing & Roll | More roll after landing. Lands hot. | Less roll. Stops quicker. |
| Typical Miss | Over-draw becomes a hook; a blocked shot right. | Over-fade becomes a slice; a pulled shot left. |
| Best For | Maximizing distance, playing into left-to-right wind, doglegs left. | Control, accuracy, playing into right-to-left wind, doglegs right, tight pins. |
The core of a consistent draw shot is feeling like you’re swinging more to the right field. For a reliable fade shot, feel like you’re swinging slightly out to left field. Your body’s stance adjustments to create these paths are subtle, think an inch or two with your feet and shoulders.
The One Club That Breaks the Rule
For every iron in your bag, the decision matrix above holds true. But there’s one glaring exception: the driver.
For the majority of amateur golfers, the fade is the better, more reliable tee shot. Here’s why the standard advice flips: 1. A Fade is Easier to Control. The out-to-in path that creates a fade also promotes a more upward strike on the driver, optimizing launch and reducing spin. This leads to more fairways. 2. The Miss is Gentler. An over-cooked fade is a slice that lands in the right rough. An over-cooked draw is a hook that loses both distance and direction, often finding trees, hazards, or another fairway. 3. It Fits Modern Course Design. Most penal trouble off the tee is on the left (bunkers, water, OB). A fade that starts at the left trouble and falls right is playing away from the hazard.
This isn’t to say you shouldn’t hit a draw with your driver. If you need that extra 15 yards on a wide-open par 5, go for it. But for the crucial tee shot on a tight par 4, the controlled fade is the percentage play. It’s the reason many tour pros, even those who shape it both ways, default to a fade with the big stick under pressure. Your driver setup should reflect this: for a fade, align your body slightly left of target and the clubface at the target.
How to Practice Both Shots
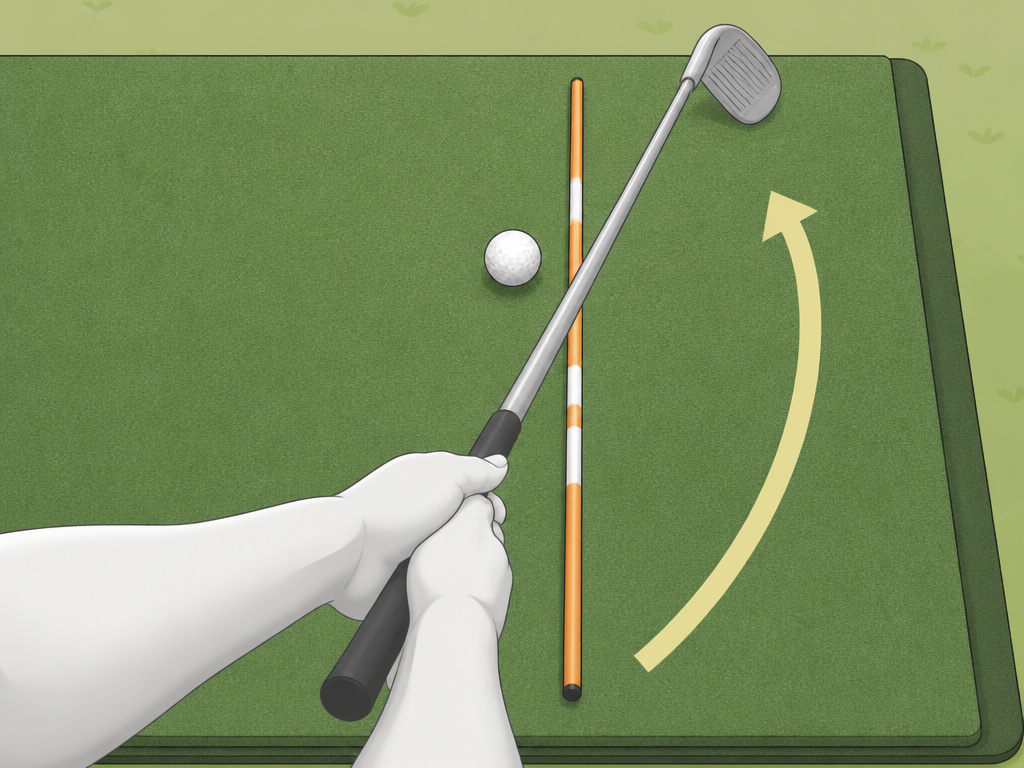 You can’t decide to hit a shot you don’t have. You need both shapes in your locker. Don’t just beat balls, practice with intention.
To Ingrain a Draw:
- Place a headcover or alignment stick just outside the ball, on the target-line side.
- Your goal is to swing the clubhead to the right of that stick, missing it entirely.
- Feel your right shoulder working under through impact, not around.
- Start with short irons, where the shape is easier to see.
To Lock In a Fade:
- Place the headcover or stick just inside the ball, on the side closest to you.
- Swing the clubhead out to the left of the stick, missing it.
- Feel like you’re holding the clubface open slightly through the hitting area.
- Again, start with a short iron or wedge to feel the left-to-right spin.
This kind of focused practice makes your shot selection on the course automatic. You’re not thinking mechanics; you’re recalling a feel.
Frequently Asked Questions
Can I play good golf only hitting one shape?
Absolutely. Most high handicaps and many low handicaps play a “stock” shot that curves one way 80% of the time. Consistency is far more important than versatility. It’s better to have one reliable curve than two unpredictable ones. Master your natural shot first.
What if my natural shot is a slice? Should I still try to hit a draw?
Not until you can hit it straight. A slice is an extreme, uncontrolled fade. Work on neutralizing your path and face angle to produce a straight shot or a gentle fade before you try to manufacture a draw. Trying to overcorrect a slice into a draw often leads to a two-way miss, which is a scorecard killer.
Does draw vs fade matter around the green?
The principles apply, but the terminology changes. Your short game shots like chips and pitches use face and path to create spin. For a bump and run that releases, you’re effectively playing a “draw”, using a more square or hooded face. For a flop shot that stops dead, you’re playing a “fade”, opening the face dramatically. The decision between a bump and run vs flop shot is the short-game cousin of the draw vs fade debate.
How does ball position affect draw vs fade?
It’s a minor influence compared to path and face. Generally, a ball position slightly back in your stance can help promote a draw by encouraging a more in-to-out path. A ball position slightly forward can help promote a fade. But these are fine-tuning adjustments. Your swing path is the primary driver.
Before You Go
Choosing between a draw and a fade isn’t about showing off. It’s about solving the problem in front of you. Use the lie as your primary guide, let the wind help you, and shape your shot away from the trouble. Remember the driver exception, when in doubt off the tee, the fade is your friend.
Spend time on the range developing both shapes. Start with your wedges and work up. When you step onto the course, that practice turns a complex decision into a simple one. You’ll see the shape before you swing, and your scores will start to reflect that clarity.
