
Guide to Putting Grip Styles, Techniques, Pressure, and Rules
This post contains affiliate links. As an Amazon Associate, we earn from qualifying purchases.
This post contains affiliate links. As an Amazon Associate, we earn from qualifying purchases.
Putting grip styles and techniques come down to three core hand placements, conventional, cross-handed, and claw, matched with the correct, consistent pressure. Elite golfers maintain a near-constant grip force during the stroke, while novices squeeze tighter as they swing, a pattern that directly disrupts path and distance control.
That pressure difference isn’t just a feeling. It’s a measurable, repeatable finding from motion-capture studies that separates single-digit handicaps from the rest. The grip is your only physical connection to the club, so its mechanics dictate everything downstream: face angle, path, and the feel that lets you judge pace on fast greens.
What follows: the three grip styles broken down by who they’re for, the biomechanics data on pressure you can’t get from a lesson, the specific USGA rules that govern putter grips (which are surprisingly lenient), and how to match a technique to the flaw you’re actually trying to fix.
Key Takeaways
- Pressure consistency, not lightness, is the goal. Data shows elite golfers keep grip force steady; novices increase it through the stroke, which pulls the putter offline.
- Cross-handed and claw grips work by simplifying wrist action. They move the dominant hand out of a controlling position, reducing the “yips”-prone twitch in short putts.
- Putter grips have unique equipment rules. The USGA allows non-circular shapes and even two separate grips on a putter, options you don’t get with any other club.
- Your grip size and material change feedback. An oversized rubber grip dampens feel, which can help shaky hands; a thin cord grip transmits more sensation for green-reading.
- Train pressure, not just placement. Drills that focus on maintaining a constant squeeze in your last three fingers build the muscle memory the data validates.
The 3 Core Putting Grip Styles
Forget endless variations. Every putting grip is a modification of one of three templates. Your choice isn’t about fashion. It’s about which one short-circuits your personal fault.
Conventional (Reverse Overlap)
This is the standard, derived from the full-swing grip. The hands sit one below the other, palms facing each other. The index finger of the lead hand (left for right-handed golfers) overlaps the fingers of the trailing hand. It feels natural because it’s familiar.
Where this goes sideways: Familiarity breeds manipulation. The trailing hand, being lower and dominant, naturally wants to take over, especially on short putts. This often leads to a wristy “pop” or a closed face at impact. Use it if you have a very quiet, pendulum-like stroke already, or if you putt exclusively with your shoulders.
Cross-Handed (Left-Hand Low)
Here, you reverse the conventional hand order. For a right-handed golfer, the left hand is placed below the right. This grip, referenced in US Patent 7261652, intentionally shifts primary control and motive force to the lead arm. The mechanics are straightforward. By placing the non-dominant hand lower, you physically restrict the dominant wrist’s ability to hinge. The stroke becomes more of a one-piece, shoulder-driven rock. It’s the most common antidote for the right-hand yips. If you constantly pull or jerk short putts, this is your first stop.
The Claw (and its variants)
This family of grips isolates the hands entirely. In a standard claw, the lead hand grips normally, but the trailing hand pinches the grip between the thumb and forefinger, with the other fingers off the club. Other versions, like the “pencil” or “saw,” experiment with this isolation principle. The goal is eradication. It removes the trailing hand’s palm from the equation, which is the source of most involuntary tension. You gain incredible face stability. The trade-off is a potential loss of feel for distance, as you’re essentially putting with one arm and a guide. It’s a surgical fix for severe hand tremors.
| Grip Style | Best For Fixing | Primary Mechanism |
|---|---|---|
| Conventional | A pure shoulder stroke that needs no correction | Maintains full-swing familiarity |
| Cross-Handed | Trailing-hand dominance, wristy strokes, short-putt yips | Locks the dominant wrist, promotes lead-arm drive |
| Claw | Severe hand tension, flipping at impact, face rotation | Physically removes the trailing palm from control |
Your putting grip types are a diagnostic tool. Pick the one that attacks your miss.
What the Biomechanics Data Says About Grip Pressure
Telling someone to “hold it like a bird” is useless. How tight is that? Biomechanics research gives us numbers and patterns instead of poetry.
A key study in the Korean Journal of Applied Biomechanics compared 10 elite golfers (handicap ≤2) with 10 novices. Each group hit putts at 1, 3, and 5 meters while sensors measured grip force. The finding was stark: elite golfers maintained a relatively constant grip force throughout the entire stroke. Novices showed a continuously increasing grip force pattern.
Think about that. As the novice’s putter head moves toward the ball, their hands are unconsciously squeezing tighter. This tightening alters the muscles in the forearms, which subtly rotates the face and pulls the path inward. Inconsistent speed is guaranteed.
The pressure doesn’t stay flat. Another study of elite college players using a Novel Pliance-x System found grip pressure starts low at address (2.41 KPa), increases to a peak just before impact (4.70 KPa), then reduces after impact. The takeaway isn’t “stay light.” It’s “don’t increase pressure during the motion.”
This is why focusing on your grip pressure is a higher-order skill than your hand placement. You can have a perfect cross-handed setup, but if you’re strangling the grip on a 4-footer, the face will shut. Practice with a focus on the pressure in your last three fingers of each hand. They should feel the same at finish as they did at address.
Drill for Pressure Awareness:
- Take your putting grip normally.
- Have a friend gently try to pull the putter out of your hands at address.
- Use just enough force to keep it from moving. That’s your maximum allowable pressure.
- Now, cut that feeling in half. That’s your baseline.
How to Match a Grip to Your Putting Flaw
Your grip is a treatment. You must first diagnose the illness. Here’s how to map common misses to a grip prescription.
Miss: Pulls or Quick, Jerky Strokes on Short Putts
- Likely Cause: Dominant hand (right hand for righties) overpowers, snapping the face closed.
- Grip Fix: Cross-handed. This is the direct solution. It subordinates the dominant hand, making it nearly impossible for it to jerk the putter inside. It’s the reason this grip is so prevalent on professional tours for putts inside six feet.
Miss: Inconsistent Face Contact, “Flippy” Feel at Impact
- Likely Cause: Excessive wrist hinge, often from trying to “scoop” or “help” the ball into the air.
- Grip Fix: Claw. By taking the trailing palm off the grip, you remove the main hinge point. The stroke becomes a rigid, arm-and-shoulder unit. Face stability improves immediately.
Miss: Lack of Feel, Poor Distance Control on Long Putts
- Likely Cause: A stroke that’s too rigid or mechanical, often from an over-correction.
- Grip Fix: Conventional. This grip allows the most natural wrist articulation, which can aid in creating the subtle acceleration needed for lag putting. If you use a claw for short putts, consider switching to a conventional grip type for putts outside 30 feet to regain some touch.
The rule is simple. Is your problem below the wrists? That’s a stroke path issue, maybe fixed by posture or alignment. Is your problem in the wrists or hands? That’s a grip issue. Start with the cross-handed test. If that doesn’t quiet things down, move to a claw variant.
The Often-Overlooked Role of Grip Size and Material
Your grip size and the grip materials you choose are active components of your technique, not passive details.
A standard grip might be 1.75 inches in diameter. An oversized grip can be 2+ inches. That extra circumference does something specific: it reduces the ability of your fingers and wrists to articulate. For a player with active, twitchy hands, a jumbo grip acts like a cast, promoting a more shoulder-driven stroke. The trade-off is a significant reduction in feedback. You’ll feel less of the putter head’s weight.
Material choice is about signal transmission. * Rubber: The most common. Offers a tacky, consistent feel and dampens vibration. Good for all-weather play and general use. * Cord: Embeds rough, fabric threads into rubber. Provides exceptional traction, especially in wet conditions, and transmits more feedback. It feels “firmer” and can encourage a lighter hold. * Leather: The classic choice for pure feel. It molds to your hands over time but requires maintenance and offers less all-weather traction.
If your hands sweat or you play in humid climates, a corded grip or a high-quality golf glove is non-negotiable. Slippage causes regripping during the stroke, which destroys consistency.
Don’t guess. If you’re experimenting with a cross-handed or claw grip, also experiment with a larger size. The two changes often work synergistically to lock down unwanted motion.
USGA Equipment Rules: What’s Actually Legal for a Putter Grip?
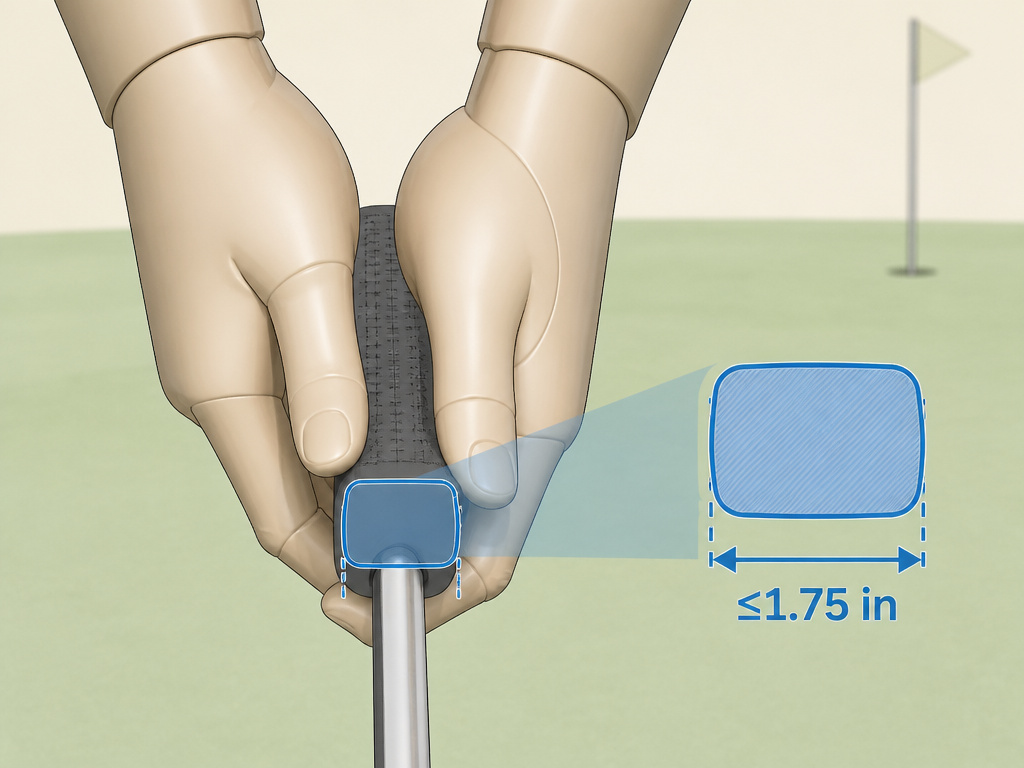
The rules for putter grips are uniquely permissive, a fact most golfers never need until they buy a non-conforming club or try a radical modification. The USGA grip equipment rules carve out specific exceptions for putters.
For all other clubs, grips must be circular in cross-section. For putters, the rule is different. A putter grip may have a noncircular cross-section (like a flat front), provided it has no concavity, is symmetrical, and remains generally similar throughout its length. This is why you see pistol-style and rectangular putter grips.
| Putter Grip Rule | Specification | Reason / Common Example |
|---|---|---|
| Maximum Cross-Section | Not exceeding 1.75 inches (44.45 mm) in any direction. | Limits the size of oversized and paddle-style grips. |
| Two Grips Allowed | Yes, if both are circular, axes coincide with the shaft, and are separated by at least 1.5 inches (38.1 mm). | Allows for “arm-lock” or “broomstick” putting styles with a second point of contact. |
| Axis Offset Rule | If the grip axis does not coincide with the shaft axis, the grip must be at least 10 inches (254 mm) long. | Governs the design of certain long, counterbalanced putters. |
Furthermore, the USGA grip rule interpretations clarify that if a putter has two separated grips, the upper grip must be at least 5 inches long. These aren’t abstract details. If you’re exploring a grip trainer that clamps onto your putter or considering cutting down a long grip, these dimensions are the line between a legal aid and a non-conforming club you can’t use in a handicap round.
The core principle behind all golf club grip regulations is to prevent a grip from being “moulded for the hands” in a way that artificially directs the stroke. The putter’s exceptions acknowledge its unique, precision role.
Training the Feel: Drills That Actually Work
Knowledge of styles and rules is static. Skill is built through repetition with intent. These drills target the specific pressures and connections that fail under stress.
1. The One-Hand Drill (For Path and Face Control)
- Do: Putt 20 balls from 10 feet using only your lead hand (left hand for righties).
- Why: This brutally exposes whether your trail hand is steering. It forces the lead arm to work correctly and ingrains the sensation of the putter swinging freely. It’s the purest training for the fundamentals of putting.
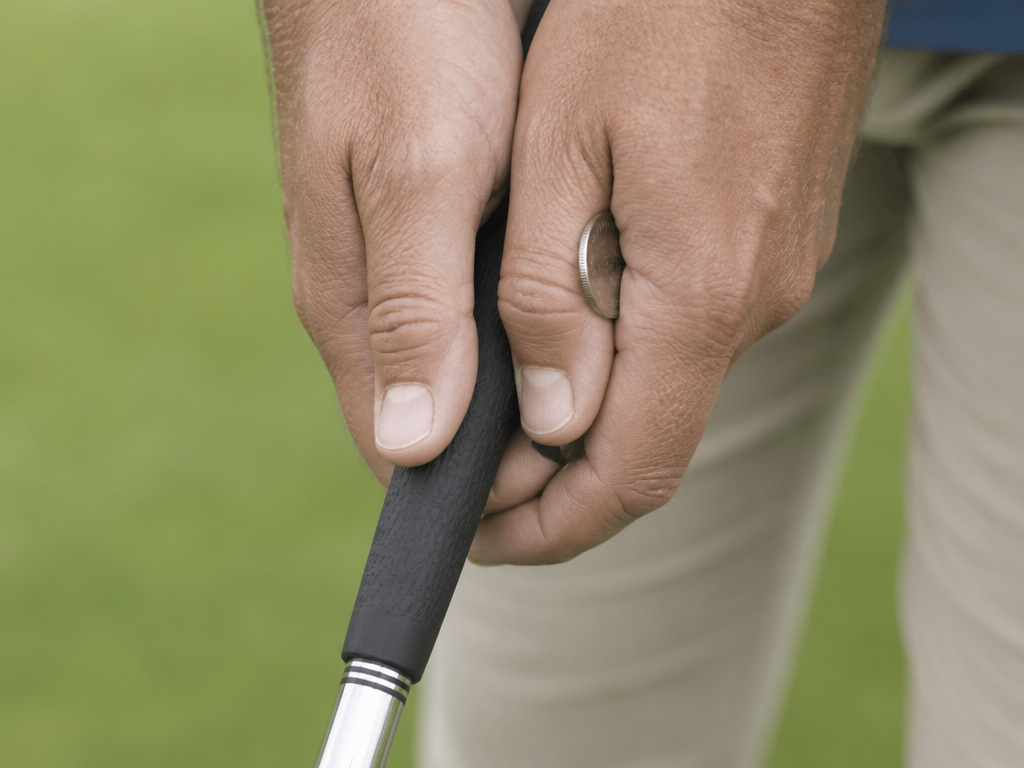
2. The Coin Drill (For Constant Pressure)
- Do: Place a coin between the thumb and forefinger pad of your trail hand. Make strokes without dropping the coin.
- Why: This creates a tangible, light connection point. If you squeeze, the coin pops out. It teaches the “dead thumb” feeling crucial for the conventional and cross-handed grips, preventing the death grip.
3. The Gate Drill (For Grip-Induced Path Errors)
- Do: Set two tees just wider than your putter head, creating a gate a foot in front of the ball. Hit putts through the gate.
- Why: If your grip pressure is increasing or your wrists are flipping, the putter head will wobble and hit a tee. The immediate feedback links an internal mistake (squeezing) to an external result (clank). It’s more effective than any grip training aid you can buy.
Mix these into your practice. Spend five minutes on the coin drill before you even hit a ball. The goal is to make the correct, constant pressure feel more normal than the tense, variable pressure you’re trying to eliminate.
Frequently Asked Questions
What is the most popular putting grip on the PGA Tour?
The cross-handed (left-hand low) grip is now the most common style on tour, especially for putts inside ten feet. Its dominance is due to its proven ability to minimize the wrist action that causes the “yips” and inconsistent face control under pressure. The conventional grip is still used by a minority, primarily for long lag putts where more wrist feel is desired.
How tight should I hold the putter?
You shouldn’t be thinking about “tight.” Focus on “consistent.” A useful benchmark is to hold the putter with just enough pressure to control it against a very gentle tug from a friend, then reduce that by half. Your forearms should feel relaxed, not engaged. The data shows the pressure should not increase during your stroke.
Can the claw grip help with the yips?
Yes, often dramatically. The claw and its variants (pencil, saw) are specifically designed as a therapeutic intervention for the yips. By radically altering the hand placement, often removing the trail hand’s palm from the grip, it breaks the neural pathway that causes the involuntary jerk or twitch. It’s a feel-killer for distance, but a life-saver for making short putts.
Are oversized putter grips legal?
Yes, oversized putter grips are legal under USGA rules, provided their cross-sectional dimensions do not exceed 1.75 inches (44.45 mm) in any direction. Many jumbo grips stay within this limit by being more rounded. They are popular because the larger circumference can help quiet hand and wrist action, promoting a more pendulum-like stroke.
What’s the difference between a strong and weak putting grip?
In a putting context, “strong” and “weak” refer to the rotation of your hands on the grip. A strong grip has both hands rotated clockwise (for a right-hander), so you see more knuckles on your lead hand. This can help promote a slight arc or a draw bias. A weak grip has hands rotated counter-clockwise, showing fewer knuckles, which can encourage a straighter-back-straight-through path or a fade bias. It’s a subtle adjustment for fine-tuning ball roll, not a fundamental style change like cross-handed or claw.
Before You Go
Your putting grip is a lever, a sensor, and a shock absorber all at once. The style you choose, conventional, cross-handed, or claw, dictates which part of that system you’re trying to simplify. The pressure you apply, as the biomechanics show, must be steady, not necessarily soft. And the gear itself, governed by specific USGA rules, offers real tools like oversized diameters and non-circular shapes to complement your technique.
Don’t cycle through grips looking for magic. Pick one style as a direct response to your most persistent miss. Train the constant pressure feel with drills that give instant feedback. And understand the rules so your equipment is always an asset, never a question. The stroke starts in your hands. Get that connection right, and the rest of the game gets a whole lot simpler.
