
Perfect Your Golf Alignment at Address with Key Aiming Techniques
This post contains affiliate links. As an Amazon Associate, we earn from qualifying purchases.
This post contains affiliate links. As an Amazon Associate, we earn from qualifying purchases.
Proper golf alignment and aiming at address requires two distinct, parallel lines: the clubface aimed at your start target and your body lines, shoulders, hips, knees, feet, set parallel left of that target (for a right-handed player). The clubface dictates about 80% of the ball’s starting direction, while body alignment controls the swing path. The most common mistake is aiming the body at the target, which forces a compensational swing to redirect the face.
The 80% figure is the consensus from launch monitor data and teaching pros like Jess Frank, who notes the ball’s start point is “directly related to the face of the golf club.” If you point the face left, the ball starts left.This mechanical reality means your setup is a geometry problem, not a feel exercise.
What follows is a breakdown of the two-line system, the USGA rules that govern your equipment’s design, and the specific tools, from a simple shaft to patented hosel markings, that cut through visual distortion. By the end, you’ll know why a one-degree aim error from ten feet misses the cup, and how to lock your lines before you ever take the club back.
Key Takeaways
- The clubface controls roughly 80% of the ball’s initial direction; your body alignment must be parallel to the target line, not pointed at it.
- Use your shaft as your primary sight line; alignment aids on the clubhead are secondary and must account for shaft lean and parallax.
- A 1-degree aim error from 10 feet misses the 4.25-inch cup by over 2 inches, small visual mistakes have large real-world consequences.
- The USGA’s 0.625-inch heel limit for non-putters defines the maximum offset, directly influencing how the club sits at address.
- Effective practice requires external feedback: use alignment sticks on the ground every session to train your eyes.
The 80% Face Rule vs. Body Lines
You don’t align your body to the target. You align it to a line parallel to the target line. This is the single most violated principle in amateur setup. The clubface points where you want the ball to start. Your feet, hips, and shoulders form a railroad track, with the ball on the outside rail and you on the inside rail pointing left of the target (for a righty).
Where this goes sideways: Aiming your shoulders at the flagstick. This forces an out-to-in swing path to square the face, producing a weak slice or pull. The correction feels wildly closed for about a week until your brain recalibrates.
The face’s dominance is why teachers emphasize it first. As instructor Jess Frank puts it, “I always encourage my student’s to point the face to the target or in the way they want the ball to start.” Your swing’s job is to deliver that face orientation back to the ball with a matching path. When body and face lines are parallel, the swing’s compensations drop dramatically.
TL;DR: Face at target. Body parallel left. Two lines, never one.
How the USGA Rules Shape Your Address Position
Your equipment isn’t a blank slate. The USGA equipment rules for clubs define the physical parameters of every conforming club, which in turn dictate how it presents itself to you at address. You’re working within a regulated box.
The most relevant spec for alignment is the heel-location rule. For clubs other than putters, the heel portion must lie within 0.625 inches (15.88 mm) of the plane containing the shaft axis and the intended line of play. This rule limits how far behind the shaft the clubhead can be positioned, affecting perceived offset and how the club “looks” when you ground it. A driver with a hosel set at this limit presents differently than a blade iron with minimal offset.
| USGA Rule Element | Specification | Impact on Address & Alignment |
|---|---|---|
| Heel Location (non-putters) | Within 0.625 in. Of shaft axis plane | Defines maximum offset; influences visual where the ball sits relative to your hands. |
| Shaft Alignment (toe/heel plane) | ≥10° divergence from vertical | Ensures the club isn’t designed for a vertical, croquet-style stroke; promotes a traditional swing arc. |
| Lie Angle (effective) | Not explicitly fixed, but tied to heel location | A heel too far from the shaft plane would create an unplayable lie angle at address. |
These are the reason clubs from different manufacturers still share a common address profile. When you’re checking your ball position, you’re interacting with the product of these rules.
The Shaft is Your Primary Sight Line
Forget the alignment line on your putter for a moment. Your most reliable visual reference is the shaft itself. At address, the shaft should appear to cover the target line directly behind the ball. If the shaft leans toward the target (forward press) or away from it (shaft lean back), that visual cue shifts, and your brain subconsciously adjusts your aim to compensate, often incorrectly.
This is where patented alignment systems, like the one in US Patent 8,133,126, come into play. They describe markings on the hosel or an appendage where “the shaft is seen as interposed between, and parallel to, the alignment markings.” The goal is to use the shaft as a rifle sight, bracketed by two parallel lines, to eliminate parallax error. Your dominant eye can trick you when looking at a line on the top of a clubhead; using the shaft as a central pillar is more reliable.
A 1-degree aim error from 10 feet misses the 4.25-inch cup by 2.1 inches. That margin for error is thinner than you think.
The problem these systems solve is parallax, the visual shift that occurs because your eyes are above, not directly behind, the ball. A simple drill: place a club on the ground pointing at a target. Now step into your address position and look down. Does it still look pointed at the target? For most, it appears aimed right. That’s parallax. Training your eyes to trust the shaft’s position, not the top-line, is a fundamental step.
Tools and Tech That Actually Work

You can’t trust your eyes without feedback. This is why the most effective training aids are the simplest and most objective. They provide an external reference point that doesn’t lie.
Alignment sticks are non-negotiable. Lay one on the ground directly at your target, and a second one parallel to it for your feet. Hit every single practice shot with them in place. The goal is to make the correct look and feel boringly familiar. Check out our rundown of the best alignment sticks for practice to find a set that works for you.
For putters, vertical alignment aids have gained traction thanks to patents like Callaway’s US 9,914,040. This design places a visual aid on the rear face along the vertical centerline to help golfers strike the ball at the ideal impact height. Why does vertical matter? Striking above or below the center of the face affects ball speed and roll consistency. Putters like the Odyssey Triple Track or TaylorMade Spider use contrasting colors and lines to frame the ball and improve vertical and horizontal alignment.
| Tool Type | Primary Purpose | Best For | Risk If Skipped |
|---|---|---|---|
| Alignment Sticks | Establishes true parallel body lines | Every full-shot practice session | Reinforcing faulty visual perception; no objective feedback. |
| Putting Alignment Aid (e.g., line on ball) | Squares putter face to intended start line | Green reading and stroke rehearsal | Aiming inconsistency; face rotation at impact. |
| Hosel Markings / Shaft-Based Systems | Reduces parallax error; uses shaft as sight | Players struggling with consistent aim | Reliance on top-line markings that can be visually distorted. |
Technology like launch monitors (TrackMan, GCQuad) provides the ultimate feedback, showing your face angle at impact to the tenth of a degree. But start with the sticks. They force honesty about your stance and setup, which is the foundation everything else builds upon.
Integrating Alignment into Your Pre-Shot Routine
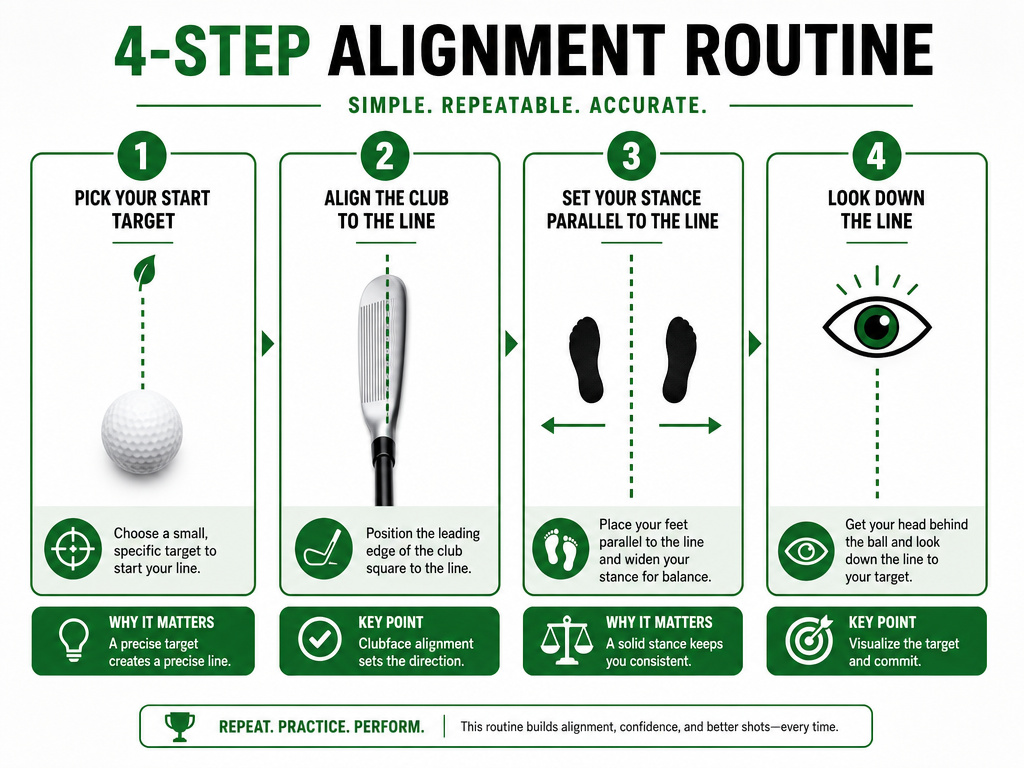
Alignment is the final, deliberate step in a repeatable process. A disciplined pre-shot routine bakes the two-line system into muscle memory so it holds up under pressure.
Here’s a simple, four-step sequence: 1. Stand Behind the Ball: Visualize the shot and pick a specific start target (a leaf, a discolored patch of grass) just a few feet in front of your ball on the desired line. 2. Set the Clubface First: Walk in and place the clubhead behind the ball, aligning the leading edge or an alignment aid directly at your start target. This is your non-negotiable first move. 3. Build Your Stance Around the Club: With your feet together, position your body so your stance line is parallel left of the target line. Then widen your feet to your desired weight distribution. The clubface hasn’t moved. 4. Final Verification: Take a last look down the target line, then a quick glance at your shaft to ensure it’s covering the line. Then go.
The entire process should take 15-20 seconds. The routine’s consistency trains your subconscious to accept the correct geometry, even when your eyes are screaming that you’re aimed “too far left.”
Common Faults and How to Correct Them
Diagnosing alignment issues is straightforward if you know what to look for. Most faults stem from confusing the two parallel lines or from a physical mismatch between your body and your equipment.
The Chronic Slice Alignment: This player aims their body at the target (or even right of it) with a clubface slightly open. The only swing path available to hit the ball forward is severely out-to-in. The fix is radical but simple: using sticks, set the body line dramatically closed (right foot pulled back) while keeping the face at the target. The resulting draw shape feels impossible at first. For a deeper dive, our guide on how to fix a slice walks through the necessary swing changes.
The Toe-Up/Iron Digger Dilemma: If your iron’s toe is high in the air at address, the lie angle is too flat for you; you’ll tend to hit shots off the toe that fade. If the heel digs, the lie is too upright, promoting heel shots that draw. This is both an alignment issue and a fitting issue. While you can adjust your posture, a proper lie angle fitting ensures the sole rests flat at address, promoting centered strikes.
Putting the Yips (Aim Version): You constantly feel misaligned on short putts. The culprit is often over-reliance on a single top-line marking without checking the shaft. Drill: Practice short putts with your eyes closed after you take your address. This removes visual noise and builds trust in your setup. Also, consider a ball with a pronounced alignment line, like a Callaway Chrome Soft X LS or a TaylorMade Tour Response, to double-check your face aim.
Frequently Asked Questions
What is the most important part of golf alignment?
The clubface aim. It dictates the ball’s starting direction. You can recover from imperfect body alignment mid-swing, but a misaligned face at impact sends the ball offline immediately. Always set the face to your start target first.
How do I know if my alignment is off without a teacher?
Use two alignment sticks or golf clubs on the ground. Place one pointing at your target and one parallel for your feet. Hit shots. If your ball flight consistently starts left or right of your intended line, your face angle at impact is off. The sticks remove all doubt about your setup.
Do putters with alignment aids really help?
Yes, but the type matters. Simple top-line lines can be distorted by parallax. More effective systems use multiple parallel lines (like Triple Track) or vertical rear-face aids to frame the ball and improve depth perception. The best putters with alignment aids provide clear, high-contrast visual cues.
How does ball position affect alignment?
Ball position, forward or back in your stance, directly influences your swing path and angle of attack. If your distance from ball is correct but the ball is too far forward, your body will naturally open to reach it, altering your alignment. Consistency in ball position is a prerequisite for consistent alignment.
Can the wrong clubs hurt my alignment?
Absolutely. Clubs with the wrong lie angle (too flat or upright) force you to adjust your posture at address to make the sole sit flush. This compensation alters your spine angle, arm hang, and ultimately, your perception of where you’re aimed. Equipment that fits your physique makes proper alignment natural.
What’s the fastest way to improve my alignment on the course?
Before every shot, use a intermediate target. Pick a spot on your target line 2-3 feet in front of your ball. When you address the ball, focus solely on aligning your clubface to that spot, not the distant flag. This simplifies the task and drastically improves accuracy.
Before You Go
Golf alignment and aiming at address is a solvable geometry problem. It requires accepting two truths: the face aims at the target, and your body aligns parallel to it. The tools for mastery are cheap, alignment sticks and a disciplined routine. The USGA’s 0.625-inch heel rule and the physics of a 1-degree error define the narrow window you’re working within.
Spend your next practice session with 80% of your focus on setting those two parallel lines. Use the sticks until the correct look becomes boring. The payoff isn’t just straighter shots; it’s the elimination of a major source of swing compensation. When your start line is trustworthy, the rest of the game gets a whole lot simpler.
