
Master Lateral Relief and Back on Line Relief Rules in Golf
This post contains affiliate links. As an Amazon Associate, we earn from qualifying purchases.
This post contains affiliate links. As an Amazon Associate, we earn from qualifying purchases.
Lateral relief and back on line relief are two specific procedures for taking relief from a red-staked penalty area (lateral water hazard). You get lateral relief when your ball is in or last crossed the margin of a red penalty area. The rule allows you to drop within two club-lengths of a designated reference point, no closer to the hole. Back on line relief is an alternative option for any penalty area; you drop anywhere on a straight line drawn from the hole through your ball’s reference point, going back as far as you want.
That distinction, two club-lengths sideways versus a line going backward, is the entire rule. Most golfers see the red stakes and just take the two club-length drop. They don’t realize the back-on-the-line option exists, or that it’s sometimes the only play that keeps you in the game.
The rest of this guide walks through the three reference points you must identify, the exact drop zones for each relief type, and the one mistake that turns a free drop into a two-stroke penalty. You’ll know which option to choose when your ball is half-submerged in a creek or nestled against a boundary fence.
Key Takeaways
- Lateral relief (Rule 17.1d) is specific to red-staked penalty areas and lets you drop within two club-lengths of a designated reference point.
- Back on line relief (Rule 17.1d(3)) is an option for ANY penalty area (red or yellow); you drop on a line from the hole back through your ball’s reference point.
- You must correctly identify your ball’s last crossing point of the penalty area margin, this is your primary reference point for all relief.
- Taking lateral relief from a yellow-staked penalty area is a breach that costs you the general penalty (two strokes in stroke play).
- The back-on-the-line option is often the smarter play when the area around your reference point is unplayable (deep rough, bushes, cart path).
The Anatomy of a Penalty Area: Red vs. Yellow
Before you can understand relief, you have to know what you’re taking relief from. The modern penalty area replaced the old terms “water hazard” and “lateral water hazard.”
The stakes tell the story. Yellow stakes (or lines) mark a standard penalty area. Red stakes (or lines) mark a lateral penalty area. The Committee designates an area as lateral typically when it’s not practical or possible to drop behind it, think of a creek that runs parallel to the fairway, or a large lake where dropping behind would put you on the next hole’s tee box.
The part nobody mentions: If your course still has old “Lateral Water Hazard” stakes, they are treated as red penalty areas under the current rules. The color, not the wording, is what matters.
This designation changes your relief options dramatically. From a yellow penalty area, your primary relief option is back-on-the-line relief. From a red penalty area, you get that same back-on-the-line option plus the additional lateral relief option. Confusing these is the fastest way to add penalty strokes to your card.
| Stake Color | Type of Penalty Area | Primary Relief Options |
|---|---|---|
| Yellow | Standard Penalty Area | 1. Stroke and Distance (re-hit). 2. Back-on-the-Line Relief. |
| Red | Lateral Penalty Area | 1. Stroke and Distance. 2. Back-on-the-Line Relief. 3. Lateral Relief (2 club-lengths). |
The Three Critical Reference Points for Relief
All penalty area relief, lateral or otherwise, starts with a reference point. Get this wrong and your drop is illegal. You have three potential reference points, and you must choose one before you take a single step to drop.
Reference Point 1: The Point Where Your Ball Last Crossed the Margin.
This is the most common reference point. Find the spot where your ball finally entered the penalty area. If it bounced twice outside before splashing, use the last spot it crossed the defined edge (the line between the stakes or the painted line on the ground). This spot is not where the ball lies in the water; it’s on the margin itself.
Reference Point 2: A Point on the Opposite Margin of a Lateral Penalty Area.
This is a rarely used but valuable option for a red penalty area. If your ball last crossed the hazard on the far side, you can use a reference point directly across the hazard, equidistant from the hole. This can sometimes give you a much better angle to the green. You must still drop within two club-lengths of that point, no closer to the hole.
Reference Point 3: The Estimated Point (When the Ball is Lost in the Penalty Area).
If you’re virtually certain your ball is in the penalty area but you can’t find it to identify the last crossing point, you must estimate that point. Use all available evidence, your shot line, where it was last seen, the topography. Your playing partners can and should help with this estimate. The accuracy of your estimate is a matter of integrity, but the rule allows for it.
Once you’ve identified and marked your chosen reference point with a tee, you can proceed to your relief options. This point is the anchor for everything that follows.
The Two Relief Options: Lateral vs. Back on Line
Here is where the procedures split. Each option creates a specific “relief area” where your ball must be dropped and come to rest.
What Is Lateral Relief (The Two Club-Length Option)?
Lateral relief is the special option granted only for red-staked penalty areas. The procedure is methodical.
First, establish your reference point (as above). Your relief area is a semicircle. It extends two club-lengths from that reference point, but it cannot extend any closer to the hole than the reference point itself. You can drop anywhere in that semicircle.
Common mistake: Measuring two club-lengths from where your ball lies in the water. You measure from the reference point on the margin, not from the ball in the hazard. Doing it wrong is playing from a wrong place.
You can use any club in your bag to measure the two club-lengths. Most players use their driver for maximum distance. The ball must first strike the ground within this relief area. If it rolls outside this area, you must re-drop. If it happens again, you then place it where it first struck the ground.
What Is Back on Line Relief?
Back on line relief is the universal penalty area option. It works for both red and yellow stakes. The mental image is simple: draw an imaginary straight line from the hole through your reference point. You can go back anywhere on that line, as far as you want. There is no limit.
Your relief area is one club-length on either side of that chosen spot on the line, creating a rectangle. Again, you cannot drop closer to the hole than your chosen point on the line.
This option is a strategic escape hatch. If the area around your lateral relief reference point is a jungle of bushes or a steep bank, going back on the line might give you a clean lie on short grass. You trade a longer shot for a playable one.
| Aspect | Lateral Relief (Red Only) | Back on Line Relief (Red or Yellow) |
|---|---|---|
| Rule | Rule 17.1d(2) | Rule 17.1d(3) |
| Relief Area Basis | Two club-lengths from reference point. | Any point on a line from hole through reference point, then one club-length sideways. |
| Distance Limit | Limited to two club-lengths. | Unlimited distance back on the line. |
| Best Used When | The area near the hazard margin is playable. | The area near the margin is unplayable (deep rough, obstruction). |
| Penalty Strokes | One stroke (plus the stroke that put you in the hazard). | One stroke (plus the stroke that put you in the hazard). |
What’s the Difference Between Lateral Relief and Back on Line Relief?
The difference is geometric and strategic. Lateral relief moves you sideways, within a tight, limited arc. Back on line relief moves you backward, along an infinite line.
Think of a par-3 over water with red stakes encircling the green. Your ball splashes short. The lateral relief area might be in more water or a bunker. The back-on-the-line option lets you drop 50 yards back in the fairway for a clear chip. Lateral relief is about convenience near the hazard. Back on line relief is about finding a playable lie, no matter the cost in distance.
Where this goes sideways: Choosing lateral relief when your ball is in a yellow-staked area. This is a breach of Rule 17.2. You get the general penalty, two strokes in stroke play or loss of hole in match play, for playing from a wrong place. Know your stake colors.
Step-by-Step: How to Take Lateral Relief Correctly
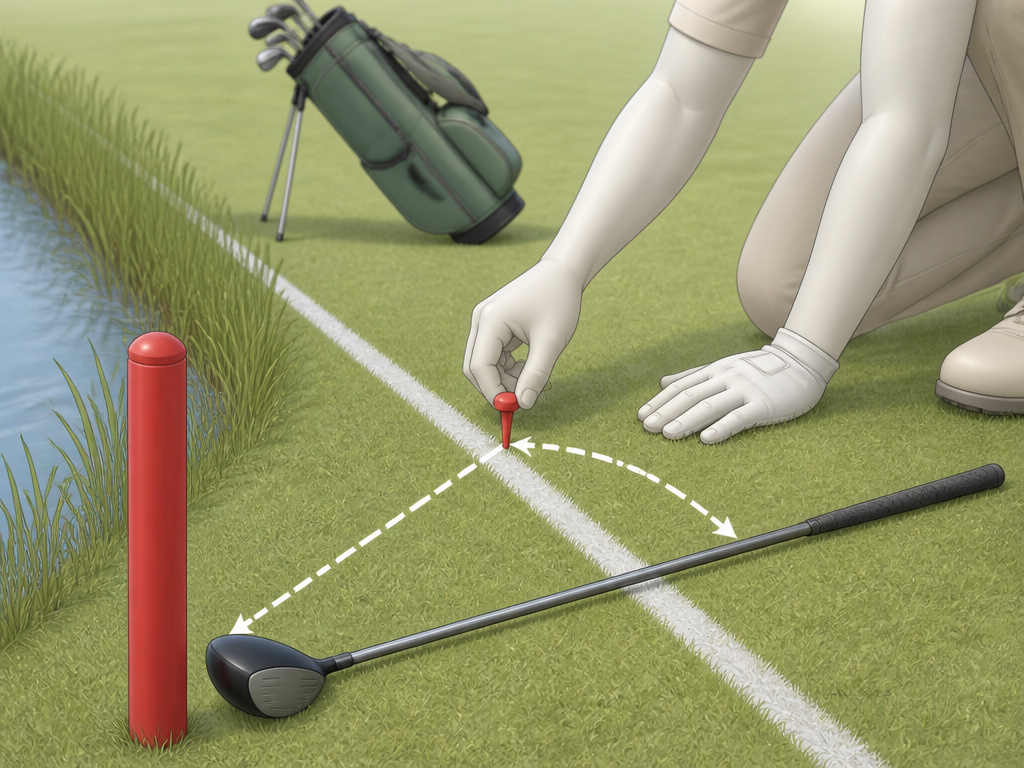 Follow this sequence exactly. Missing a step risks a penalty.
- Confirm the Stakes are Red. Walk up and look. Don’t assume. If they’re yellow, lateral relief is off the table.
- Identify Your Reference Point. Find the spot where your ball last crossed the margin of the penalty area. Mark it with a tee.
- Measure Your Two Club-Length Relief Area. Using your longest club, measure two club-lengths from the reference point. Remember the area is a semicircle not closer to the hole.
- Choose Your Spot and Drop. Select a spot within the measured area. Stand upright, hold the ball at shoulder height with your arm extended, and drop it. Let it fall from your hand; don’t toss it.
- Check the Result. The ball must first hit the ground within the relief area. If it rolls outside this area (and comes to rest more than one club-length from where it struck), you must re-drop. If it happens again, place it on the spot where it first hit the ground on the second drop.
Skipping step one, confirming the stake color, is the most common procedural error. The second is measuring from the ball in the hazard instead of the reference point on the margin. Both errors lead to playing from a wrong place.
When to Choose Back on Line Relief Over Lateral
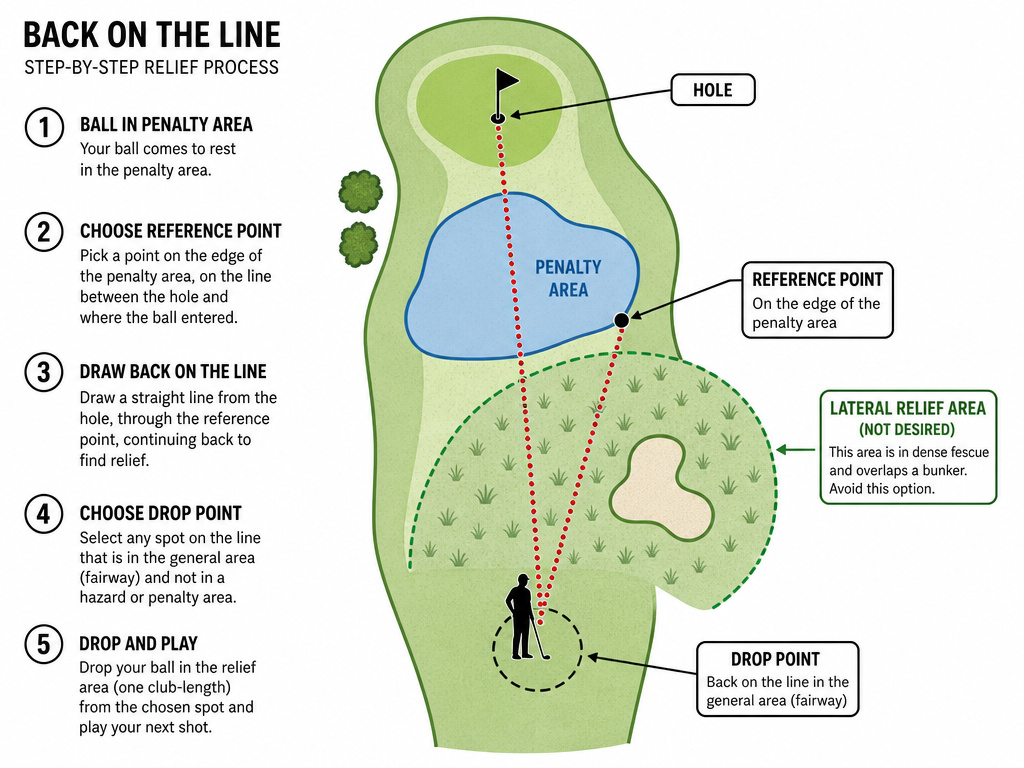 You have the option. Use it strategically. Choose back on line relief when the geometry or terrain of the lateral relief area works against you.
Scenario 1: The Lateral Relief Area is Unplayable.
Your reference point is right next to the hazard, but the two club-length area is all thick, knee-high fescue or a large immovable obstruction like a boundary fence. Taking lateral relief would leave you with another impossible shot. Use the back-on-the-line option to find the nearest patch of fairway on that line, even if it’s 30 yards back.
Scenario 2: You Need a Specific Angle.
The lateral relief area might give you a stance, but the green is completely blocked by trees. Going straight back on the line might open up a clear approach shot. The rule gives you this flexibility to find a playable and strategic position.
Scenario 3: You Want to Avoid Another Hazard.
Sometimes, the two club-length semicircle from your reference point overlaps another penalty area or a bunker. Dropping there risks immediately finding another hazard. By going back on the line, you can bypass that second trouble spot entirely.
The key is to stop, look, and think. The lateral drop is not automatic. Assess both your relief areas before pulling a club to measure.
Common Mistakes and How to Avoid a Penalty
The rules around relief are strict. A casual attitude costs strokes.
Mistake 1: Taking Lateral Relief from a Yellow Hazard.
This is the cardinal sin. It results in the general penalty. Drill the color distinction into your head: Red = Lateral option available. Yellow = No lateral option.
Mistake 2: Dropping Within Two Club-Lengths of the Ball’s Location in the Hazard.
You must use the reference point on the margin. If your ball is ten feet inside the stakes in the water, your relief area is not around that spot in the pond. It’s around the point on dry land where it crossed.
Mistake 3: Forgetting the “No Closer to the Hole” Restriction.
Your entire relief area, for both lateral and back-on-line, is defined by being no closer to the hole than your reference point (or chosen point on the line). It’s easy to get turned around, especially on doglegs or around greens. Double-check your position relative to the flag.
Mistake 4: Not Re-Dropping When Required.
If your dropped ball rolls outside the relief area, you must re-drop. If you play it from there, you’ve played from a wrong place. The penalty is two strokes in stroke play. Be disciplined about the re-drop.
Easy to miss: The one-club-length roll rule. After a drop, the ball can roll up to one club-length from where it first struck the ground, as long as it doesn’t roll into a hazard, out of bounds, or closer to the hole. If it rolls more than one club-length, even if it stays in the relief area, you must re-drop. Most players don’t measure this.
Frequently Asked Questions
Can I take lateral relief from a yellow-staked water hazard?
No. Lateral relief is permitted only for penalty areas marked with red stakes or lines. If you take a two club-length drop from a yellow hazard, you are playing from a wrong place and will incur a two-stroke penalty in stroke play. Your only relief options from a yellow penalty area are stroke and distance or back-on-the-line relief.
What if my ball crosses the red stakes but is found outside the hazard?
If your ball is found outside the margin of the penalty area, you are not in the hazard. You must play it as it lies, even if it’s in a terrible spot. The stakes define the margin; if your ball is outside that line, the penalty area rules do not apply. You can only take relief if there is interference from an abnormal course condition or an obstruction, under different rules.
How do I determine the “last crossing point” if my ball bounced?
Trace the flight of your ball backward from where you found it (or where it was lost). The last place it would have crossed over the defined edge of the penalty area (the line between two red stakes or a painted line) is your reference point. It’s the final point of entry, even if the ball bounced inside the hazard before that.
Can I use the back-on-line option from a red hazard even if the lateral area is fine?
Absolutely. You have the choice. Rule 17.1d gives you both options for a lateral (red) penalty area. You are never forced to take lateral relief. If you believe going back on the line offers a better strategic position, you may choose that option without penalty.
What’s the penalty for dropping in the wrong place?
Playing a ball from a wrong place when taking relief results in the general penalty. In stroke play, that is two strokes. In match play, it is loss of the hole. If the mistake is serious (e.g., you gained a significant advantage), you might be required to correct the error before playing from the next tee or risk disqualification.
Does “two club-lengths” mean my driver?
Yes. You may use any club in your bag to measure the two club-lengths. Most players use their driver to maximize the size of the relief area. The length is measured from the toe of the clubhead placed at the reference point to the end of the grip. You cannot use a club that is not in your bag for the round.
Before You Go
Lateral relief and back on line relief are tools, not mysteries. Red stakes grant you the lateral option, a two club-length arc from a precise reference point. That same red hazard, and all yellow ones, also allow the back-on-the-line escape route.
The smart player doesn’t just grab the nearest patch of grass. They identify their reference point, evaluate both potential relief areas, and choose the drop that offers a real next shot. Remember the stake color. Measure from the margin, not the ball. And when the jungle surrounds your lateral drop zone, look backward. The line going straight back is almost always there, waiting to bail you out.
