
How to Stop Thin Shots for Good | Fix Your Impact Position Now
This post contains affiliate links. As an Amazon Associate, we earn from qualifying purchases.
This post contains affiliate links. As an Amazon Associate, we earn from qualifying purchases.
To stop hitting thin shots, you must move your swing’s low point forward. The club bottoms out behind the ball, so it’s already rising at impact. Fix it by shifting 70–80% of your weight to your lead side before impact, keeping your head from drifting away from the target, and playing the ball in the center of your stance. A forward low point delivers a descending blow and ball-first contact.
That low point shift is a measurable physical change in where your club meets the ground. The difference between a compressed iron and a skulled rocket is often less than two inches of turf, the distance between a divot that starts behind the ball and one that starts just in front of it.
What follows breaks down the three mechanical leaks that push your low point back. You’ll get a diagnostic table to pinpoint your cause, two drills that give instant feedback, and the mental trigger that stops thin shots under pressure.
Key Takeaways
- Thin shots happen when your swing’s low point is behind the ball. The club is rising at impact, catching the ball’s equator.
- The three primary causes are a weight shift that hangs back, a head that drifts away from the target, and a ball position that’s too far forward.
- Forget “keep your head still.” For solid contact, your head must move slightly toward the target in the downswing to let your trail shoulder get on top of the ball.
- Use the alignment rod drill for immediate feedback on head movement. If your trail ear touches the rod in the backswing, your low point is moving backward.
- A consistent thin/fat pattern signals erratic low point control. Treat both misses as the same root problem, not two separate issues.
The 3 Root Causes of Thin Contact
A thin shot, also called a skull or a blade, is a geometry problem. The club’s leading edge strikes the middle or top of the ball because the lowest point of your swing arc is behind it.You’re hitting on the upswing. Three swing faults create this, and most golfers suffer from at least one.
Cause 1: Your Weight Stays Back
Impact with an iron demands a forward lean. About 70–80% of your weight should be on your lead foot at the moment of contact. If your weight hangs on your trail side, your body subconsciously stands up to reach the ball. This “early extension” pulls the club upward, moving the low point behind you. The shot feels weak and stings your hands.
Cause 2: Your Head Drifts Off the Ball
The old tip “keep your head down” is incomplete. A still head is fine, but a head that drifts away from the target in the backswing is a disaster. This shifts your entire swing center backward. Your low point moves with it, now stationed behind the ball. When you start down, you have to throw your hands to make contact, adding loft and guaranteeing a thin strike.
Cause 3: The Ball Is Too Far Forward
Ball position is a setup leak with immediate consequences. If the ball creeps toward your lead foot, the club has already passed its bottom and is ascending when it arrives. Even with perfect mechanics, this position produces thin contact. It’s most common with mid-irons, where players instinctively try to “help” the ball into the air.
Common mistake: Trying to lift the ball by scooping with your hands. This drops the trail shoulder and raises the clubhead, ensuring the low point stays behind the ball. You’ll feel a digging chunk one shot and a thin line drive the next.
| Cause | What It Looks Like | The Low Point Result |
|---|---|---|
| Weight Stays Back | Hips thrust toward ball, chest up at impact. | Shifts 2-4 inches behind the ball. |
| Head Drifts | Head moves laterally away from target in backswing. | Moves back with head; contact is erratic. |
| Ball Too Forward | Ball aligned with lead heel for a 7-iron. | Club is already ascending; thin is guaranteed. |
The fix for each is distinct. A weight shift fault needs a body drill. A head movement issue needs a physical barrier. A ball position error just needs a check with your feet.
Fix 1: The Step Drill for Weight Shift
This is about sequencing the move so your weight arrives at your left side before the club does. The step drill makes the feeling impossible to ignore.
Take your normal setup and backswing. As you start the downswing, literally step your trail foot toward the target. Don’t swing yet, just step. Feel your hips clearing and your weight crashing onto your lead foot. Now, incorporate that step into a half-swing. The exaggeration trains your lower body to lead the action.
Why it works: The step forces a drastic weight transfer. It gets the club’s path moving left and the angle of attack moving down. You can’t step forward and stay on your back foot. After twenty step-drill swings, hit ten normal shots. Your body will remember the sequence.
Skipping this drill means you’re trying to fix a body movement with arm swing. That never holds up. On the course, under pressure, you’ll default to hanging back and hitting thin over a hazard.
Fix 2: The Alignment Rod Drill for Head Movement
Forget keeping your head still. The goal is keeping it from moving away from the target. Mark Blackburn, the 2020 PGA Teacher of the Year, teaches that the head must actually move toward the target in the downswing to allow proper rotation. The alignment rod drill gives you black-and-white feedback.
Have a partner hold an alignment rod or a driver shaft just outside your trail ear at address. Make your backswing. If your ear touches the rod, your head is drifting back, pulling your low point with it. The goal is to turn without contact.
On the downswing, the goal reverses. Your head should move back toward the target as your hips continue to drive forward. Again, no contact with the rod. This single drill fixes both the backswing fault and the downswing compensation.
I won’t recommend a mirror for checking head movement. The feedback is delayed and you can’t see the lateral drift in real time. The rod doesn’t lie. Either you hit it or you don’t.
This drill isolates the cause of many consistent thin and fat shots. If your head is stable, your low point is stable.
Fix 3: Center Your Ball Position
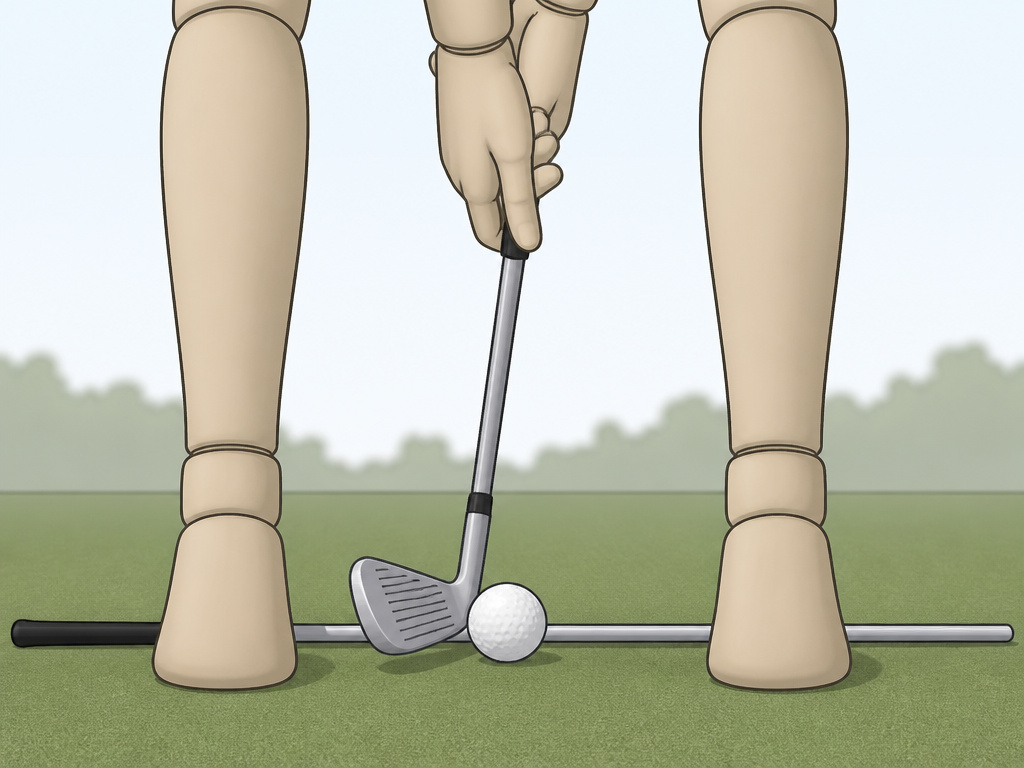 This is the five-second fix. For your mid-irons, 7-iron through 9-iron, the ball should be centered between your heels. Not forward, not back. Use a club laid on the ground across your toes as a reference. For short irons and wedges, move it an inch back. For long irons and hybrids, move it an inch forward.
A ball too far forward makes clean contact a lottery. You’re asking the club to do something it’s not designed to do. Combine a forward ball position with any other flaw, and thin shots become inevitable.
Check your hands, too. At address, your hands should be slightly ahead of the ball, creating forward shaft lean. If your hands are even with or behind the ball, you’ve added loft and moved the low point back before you even start. This setup alone can cause a thin/fat pattern that feels unsolvable.
Drills for Low Point Control
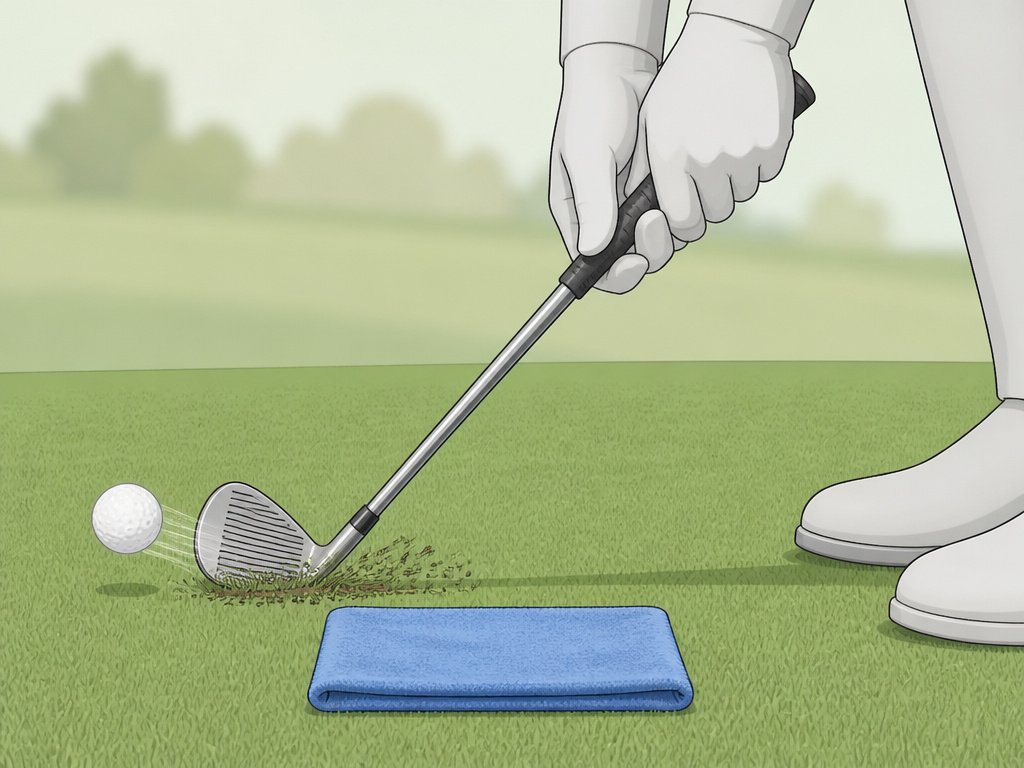 Drills train feel. These two create the sensation of a forward low point and descending blow.
The Towel Drill
Place a small towel or headcover about two inches behind the ball. Your goal is to hit the ball without touching the towel. If you strike the towel, your low point is too far back and you’re hitting behind it. This drill is brutally honest. Start with half-swings to learn the sensation of brushing the grass after the ball.
The Teed Iron Drill
Tee up an iron shot very low, just so the ball sits slightly above the grass. Hit shots focusing on taking a divot that starts ahead of the tee. The tee gives you a perfect visual of where your club entered the ground. If your divot starts at the tee or behind it, you haven’t moved your low point forward. This drill is the best bridge between range practice and fairway turf.
Mastering these drills builds the low point control that leads to consistent irons.
Diagnosing a Thin/Fat Pattern
If you alternate between skulling the ball and chunking it, you have one problem, not two. Your low point is inconsistent. Sometimes it’s too far back (fat), and sometimes your body stands up to compensate (thin).
| Your Miss | Likely Low Point | Immediate Fix |
|---|---|---|
| Mostly Thin | Consistently behind the ball. | Focus on head movement (Alignment Rod Drill). |
| Mostly Fat | Well behind the ball. | Focus on weight shift (Step Drill). |
| Thin AND Fat | Erratic; moving shot to shot. | Focus on ball position and quiet head (Towel Drill). |
The solution is to stop chasing each miss individually. Work on the drills that stabilize your swing center. A reliable low point eliminates both extremes. This is especially true when hitting long irons, where low point errors are magnified.
The Mental Key Under Pressure
Mechanics fail when tension arrives. Over a water carry, the common instinct is to “help” the ball up and away from trouble. You freeze your lower body, lift with your arms, and produce a classic thin missile into the drink.
The mental fix is a trigger word: “forward.” Before you swing, remind yourself that solid contact comes from hitting forward, not up. Your only job is to move your low point past the ball. This shifts focus from the hazard to a tangible, internal movement. It breaks the cycle of overthinking your swing.
Tempo is the other half. A quick, jerky transition from the top is the number one killer of sequencing. It disconnects your lower body from your arms. Take an extra second at the top. Feel your weight begin to shift, then let your arms drop. Smooth tempo keeps your low point in front.
Practicing for Lasting Change
Range time must be deliberate. Hitting ball after ball without a goal reinforces your current pattern.
- Warm up with the Step Drill (5 minutes). Use a 7-iron. Don’t worry about ball flight.
- Switch to the Alignment Rod Drill (5 minutes). Focus on the backswing first, then the downswing.
- Hit 20 balls with the Towel Drill (10 minutes). Use a wedge. The feedback is instant.
- Hit 10 normal shots with your 7-iron. Note the flight and feel. Is contact more solid?
- Finish with your on-course trigger. Pick a target, say “forward,” and execute.
This sequence addresses the fault, ingrains the feel, and transfers it to a performance setting. Practicing on a quality hitting mat can help maintain this feel at home, as long as the mat gives accurate turf interaction feedback.
Frequently Asked Questions
Why do I hit thin shots only with my irons, not my driver?
Because the required angle of attack is opposite. A driver is designed to hit the ball on the upswing, with a low point behind the ball. Irons demand a descending strike. If you use a “sweeping” driver swing with your irons, the low point is too far back. The fixes are the same, shift weight forward, control head movement.
Can the wrong golf ball cause thin contact?
Not directly. A thin shot is a swing path issue. However, a very hard, distance-focused ball will feel harsher and fly lower on a thin strike, making the miss more punishing. A softer golf ball for distance might feel slightly better, but it won’t fix the root cause. Work on your strike first, then fit the ball.
Is a thin shot the same as a ‘shank’?
No. A shank hits the ball off the hosel of the club, sending it violently to the right. A thin shot makes contact on the clubface, but too high on the face. They have different causes. A shank is usually an extreme path issue; a thin shot is a low point issue.
How does this relate to hitting a punch shot or stinger?
punch shot or a stinger is a controlled, low-trajectory shot that requires a forward low point and a de-lofted club. Mastering the fixes for thin shots, forward weight, centered head, ball back, gives you the exact technique needed to execute these shots on purpose. The thin shot is the unwanted version of the punch.
I’ve fixed my thin shots, but now I’m pulling the ball left. What’s wrong?
Congratulations, you’re now hitting the ball with a forward low point and a club path moving to the left. This is a better problem. The pull means your face is square to that leftward path. To straighten it out, focus on releasing the club fully through impact, allowing the face to rotate back to square.
The Bottom Line
Thin shots end when you stop the club from bottoming out behind the ball. The physics are non-negotiable. Move your weight forward, keep your head from drifting away, and center the ball in your stance. Use the alignment rod and towel drills for feedback you can’t argue with.
On the course, think “forward,” not “up.” Trust that a descending blow creates its own lift. The crisp, compressed strike is the direct result of a low point that happens two inches ahead of the ball. Build that, and the thin shots disappear for good.
